Dig it
You may recall from my earlier post that the panels are, and the rack was to be, 96" from front to back and that my calculus to derive the post locations came up with spacing of about 86" center to center for those posts.
Turns out I had dug a full row of the post holes in the wrong places.
Not the first mistake on this project and not the last.


 Ah. So in reality I needed roughly 74" between post centers. Furthermore I had an important dimension for the post heights. Not only did I know how far apart they needed to be but now I had a value for the heights of the front row vs. the back row of the posts. I'll come to that shortly.


But I'll get back to that in a minute.
I was still in the design phase of the project and had gotten a bit... consumed about the design of the rack, especially how deep it should be front to back. I knew the panels were 96" but the rack might need to be deeper depending on how I laid out the panels and secured them to the front and back faces of the rack.
The old arrays (both the one that collapsed and the one still standing) had the solar panels lying on plywood. A simple solution that has its merits but the design led to the accumulation a lot of dirt and dust under the panels near the pipes and in the rainy season that stuff gets wet and rots the wood in the array.
You can see both around the connection of these two panels on the old array:

The design I'd been working with had the panels resting on what are called furring strips (essentially long wooden slats) that lay across the rack. It's a good design but I was concerned that the panels might sag a bit around the slats when the sun was hot. Some people had reported this. Hmm...
I had read about a design where the panels lay on corrugated roof panels like this.

And what's a standard length for those panels? 96" x 26".
When overlapped by one row then matched the width of solar panels perfectly. I'll need 8.
This design solved a lot of problems and didn't add much expense. I'm going with it.
I tried to buy the panels with our local lumberyard / hardware place in the village, Murphy's.
Like most places these days they were insisting on appropriate protections.

Turns out the roof panels would take a week to be delivered.
However I did order the lumber for the rack and the concrete for the posts.
Ordered the roof panels from Home Depot online and was off to pickup in Salinas within an hour. Rick offered the use of his truck. I parked in out front and they brought the panels out to the truck. Nice.
The next day the lumber arrived. I now had most of the materials laid out by the side of the house and got to testing configurations of panels.


It became pretty clear that the simplicity needed to rule the day.
96" solar panels + 96" roof panels = 96" rack
Sometimes I'm not the sharpest tack.
I was now getting to the "no excuses" phase and needed to start building soon.
That's when I revisited my post hole layout.
I still liked the 86" measure from post to post but the geometrician in me forgot about the angle of the panels.
Doh!
Allow me to explain.
Remember the iPad calculation drawing I did? Well I left out one line from that in my last post. I line that I added as I realized what I was missing. Here's that calculation again with the new line on the bottom and underlined.


The panels aren't going to be flat. Sure they'll be flat on the rack but the rack will be tilted about 30 degrees.
Zo...
Mr. Math here realized that we now needed to channel Euclid and Pythagoras but with some modern help.

From my iPad:

Back to digging (and measuring).
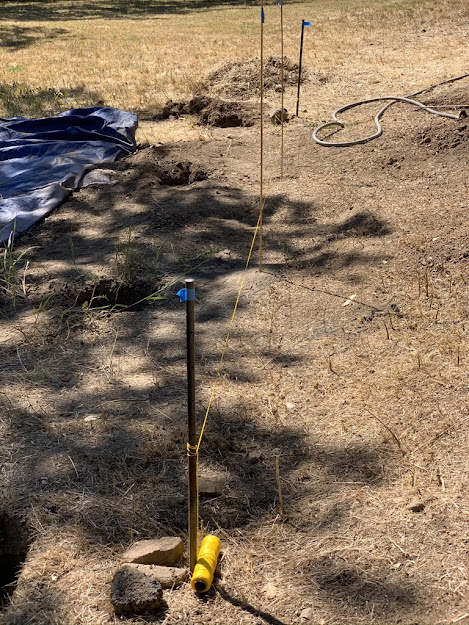
I used metal posts to lay out string to line up the holes. Note the old holes on the left. Sigh.

Truth is, once I got this worked out, I progressed rapidly.
But Jesus that dirt was hard. Easily 45 mins per hole. Did I mention it was hot?
The holes needed to be effectively 12" cubes. Same deep as wide. I knew that was deep enough as the posts wouldn't be that high and they'd be connected together on the rack all adding to the strength and stability of the frame. The width of the hole is supposed to be about 3x the width of the post for the concrete.
So location and depth of holes... resolved.
But here's the big question: How long do the posts have to be?
Allow me to elaborate and refer to my post numbering in my earlier rack drawing.

In the photo below, the hole in front on the lower right (metal pole sticking up) will be post 8 and the hole for post 1 can be easily seen on the upper row just to the left of the leaning shovel.

Now the hill is sloped. Yes that I did anticipate.
Here's the drawing I made looking at the measurements I had for post 1 and post 5:

This is important not for the depth of the holes but for the length of the posts.
Furthermore the hill doesn't just slope down; it also slopes left to right.
On the bottom row is slopes down to the right. The hole for post 8 sits about 7 inches lower than the one for post 5.
Guess what else? On the top row it slopes up! The hole for post 4 actually sits about 4 inches above the hole for post 1.
I need a protractor. And valium.
I had to measure the depths of all the holes relative to each other to ensure I would cut posts the right lengths to have a level array.
I had dreams about yellow string and levels.
The most important posts to sink first were the corners so I measured those most closely initially.
Furthermore it was important to establish that the bottom of the rack array (from post 5 to 8) shouldn't flush flat to the ground. The bottom row of posts need to be 12" long to clear the hole and I needed to be sure there would be some clearance for the bottom of the rack so I decided to go with about 12" of additional length.
Because the bottom row slopes down to the right I realized that post 5 would be the shortest one. I used that as the base to measuring all the other posts.
Now I knew that:
A. Post 5 was going to be 24" and (going back to my triangle diagram) that,
B. Post 1 needed to be 43" longer than post 5 to achieve a 30 degree angle but also that,
C. Post 1 was already 18" up the hill from post 5
So... here's my drawing calculating the lengths of post 5 relative to post 1.

Yes signed copies of my drawings will be available for purchase in the lobby.
One day... maybe... I'll actually cut a post.
But that's the next post. No pun intended.
Comments